Swiftly access Marvel Characters
January 27, 2015
marvel
rest
swift
ios
JSON
As a kid I used to devour Marvel Comics all the time. Recently with regular Marvel films coming out, there has been renewed interest in the Marvel universe. Marvel kindly released an API that allowed access to all things from their characters to comics to events. This article will show how to access the Marvel API from within an iOS application written in Swift.
The first thing you need to do is sign up for a developer’s account at the http://developer.marvel.com/. This will give you public/private keys and access to their documentation. The keys are required to access the API.
My starting point was a vanilla iOS ‘Single View Application’. I used cocoapods to setup the dependencies. For this application I chose to leverage SwiftHttp for the HTTP communications and JSONJoy-Swift to map the JSON response back to a Swift structure.
My podfile looks like this.
source 'https://github.com/CocoaPods/Specs.git'
platform :ios, '8.1'

pod 'SwiftHTTP', :git => "https://github.com/daltoniam/SwiftHTTP.git", :tag => "0.9.1"
pod 'JSONJoy-Swift', :git => "https://github.com/daltoniam/JSONJoy-Swift.git", :tag => "0.9.1"
Once setup, I added a simple iOS view with an UIImageView and a download button.
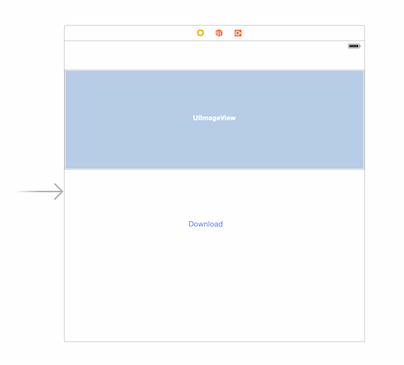
What the application will do, is upon clicking the download button, we will access the API, download the details of ‘Ant Man’ and set his thumbnail to the image view.
1.We will access the details of ‘Ant Man’ via the Comic Character API. To get his details we will issue an HTTP GET request to http://gateway.marvel.com:80/v1/public/characters/ with a few parameters:
- his name
- api key (the public key)
- ts (the timestamp or a value that changes per request)
- hash (an md5 hash of the ts + public key + private key)
More details of the API can be found here
2.Define an IBAction for the download button. Within the action, we will create the HTTP request and initiate the download.
    @IBAction func download(sender: AnyObject) {

    }
Add the import statement to the top of the ViewController file.
import SwiftHTTP
import JSONJoy
To create a HTTP request we need to create a HTTPTask. Our first iteration of the method will look like this.
    @IBAction func download(sender: AnyObject) {
        let name = "Ant-Man"
        let url = "http://gateway.marvel.com:80/v1/public/characters"
        var request = HTTPTask()
        let publicKey = "YOUR PUBLIC KEY"
        let ts = NSDate().timeIntervalSince1970.description

        request.GET(url, parameters: ["nameStartsWith": name, "apikey": publicKey, "ts" : ts], success: { (response: HTTPResponse) -> Void in
            println("got a response: \(response.responseObject)")
        },{(error: NSError, response: HTTPResponse?) -> Void in
            println("got an error: \(error)")
        })
      }
Fill in your public key with the public key from your developer account. We’re using the nameStartsWith parameter to retrieve Ant-Man
3.The request won’t work unless we hash the private key and pass it as a parameter. To do this will need to apply an MD5 hash to the timestamp concatenated with the public key and private key. To perform an MD5 hash in Swift I used this gist which extends the String class to add an MD5 method.
So create a file called “Swift-MD5.swift” and add the contents of the gist in there. You will need to add a bridging header file to import CommonCrypto/CommonCrypto.h which is required for the MD5 hashing.
We can create a hash for our request now.
        let publicKey = "YOUR PUBLIC KEY"
        let privateKey = "YOUR PRIVARE KEY"
        let ts = NSDate().timeIntervalSince1970.description
        let hash = "\(ts)\(privateKey)\(publicKey)".md5()
4.Putting this together our download function will look like this:
    @IBAction func download(sender: AnyObject) {
        let name = "Ant-Man"
        let url = "http://gateway.marvel.com:80/v1/public/characters"
        var request = HTTPTask()
        let publicKey = "YOUR PUBLIC KEY"
        let privateKey = "YOUR PRIVARE KEY"
        let ts = NSDate().timeIntervalSince1970.description
        let hash = "\(ts)\(privateKey)\(publicKey)".md5()

        request.GET(url, parameters: ["nameStartsWith": name, "apikey": publicKey, "ts" : ts], success: { (response: HTTPResponse) -> Void in
            println("got a response: \(response.responseObject)")
        },{(error: NSError, response: HTTPResponse?) -> Void in
            println("got an error: \(error)")
        })
      }
Starting up the application and pressing the download button will initiate the request. This will result in text outputted like below in the console.
got a response: Optional({
    attributionHTML = "<a href=\"http://marvel.com\">Data provided by Marvel. \U00a9 2015 MARVEL</a>";
    attributionText = "Data provided by Marvel. \U00a9 2015 MARVEL";
    code = 200;
    copyright = "\U00a9 2015 MARVEL";
    data =     {
        count = 2;
        limit = 20;
        offset = 0;
        results =
        ...
            etag = b38bb16e6d445c247e1edb3b5decde4f3caa1b2d;
    status = Ok;
5.To do something meaningful with the output we will parse it and convert it into a struct so we can use the data. Let’s define the struct class.
So create a file called Character.swift. Add the fields that we will parse from the response. The file should resemble the contents below:
import Foundation
import JSONJoy

struct Character : JSONJoy {
    var status: String?
    var code: Int?
    var thumbnail: String?

    init() {
    }

    init(_ decoder: JSONDecoder) {
        status = decoder["status"].string
        code = decoder["code"].integer
        if let arr = decoder["data"]["results"].array {
            let path = arr[0]["thumbnail"]["path"].string
            let fileExtension = arr[0]["thumbnail"]["extension"].string
            thumbnail = "\(path!).\(fileExtension!)"
        }
    }
}
We are using JSONJoy-Swift to parse the response. The code takes the response according to the documentation and assigns it to the fields in the struct.
Now in our download method, we need to parse the response into a Character struct.
@IBAction func download(sender: AnyObject) {
        let name = "Ant-Man"
        let url = "http://gateway.marvel.com:80/v1/public/characters"
        var request = HTTPTask()
        request.responseSerializer = JSONResponseSerializer()
        let publicKey = "YOUR PUBLIC KEY"
        let privateKey = "YOUR PRIVATE KEY"
        let ts = NSDate().timeIntervalSince1970.description
        let hash = "\(ts)\(privateKey)\(publicKey)".md5()

        request.GET(url, parameters: ["nameStartsWith": name, "apikey": publicKey, "ts" : ts, "hash": hash], success: { (response: HTTPResponse) -> Void in
            if (response.responseObject != nil) {
                let character = Character(JSONDecoder(response.responseObject!))
            }
        },{(error: NSError, response: HTTPResponse?) -> Void in
            println("got an error: \(error)")
        })
    }
We’ve added the responseSerializer to be a JSONResponseSerializer. And we’ve converted the response to be a Character struct.
6.The last piece of the puzzle is to download the thumbnail and assign it to the UIImageView. For this we will use SwiftHTTP and download the image using that. We will add a method that takes a Character struct, downloads the thumbnail and assigns it to the UIImageView. I’m not going to go into too much detail with this method as it really is about how to use SwiftHTTP as opposed to how to use the Marvel API which is the point of this article.
func downloadCharacter(character: Character) {
        var request = HTTPTask()
        let downloadTask = request.download(character.thumbnail!, parameters: nil, progress: {(complete: Double) in
            println("percent complete: \(complete)")
            }, success: {(response: HTTPResponse) in
                println("download finished!")
                if response.responseObject != nil {
                    let data = NSData(contentsOfURL: response.responseObject! as NSURL)
                    dispatch_async(dispatch_get_main_queue()) {
                        self.imageView.image = UIImage(data: data!)
                    }
                }

            } ,failure: {(error: NSError, response: HTTPResponse?) in
                println("failure")
        })
    }
Note that the assignment of the imageView happens on the main thread. This is the correct way to update any view object.
7.So if we put everything together now. We can invoke the downloadCharacter function from our download function.
@IBAction func download(sender: AnyObject) {
        let name = "Ant-Man"
        let url = "http://gateway.marvel.com:80/v1/public/characters"
        var request = HTTPTask()
        request.responseSerializer = JSONResponseSerializer()
        let publicKey = "YOUR PUBLIC KEY"
        let privateKey = "YOUR PRIVATE KEY"
        let ts = NSDate().timeIntervalSince1970.description
        let hash = "\(ts)\(privateKey)\(publicKey)".md5()

        request.GET(url, parameters: ["nameStartsWith": name, "apikey": publicKey, "ts" : ts, "hash": hash], success: { (response: HTTPResponse) -> Void in
            if (response.responseObject != nil) {
                let character = Character(JSONDecoder(response.responseObject!))
                self.downloadCharacter(character)
            }
        },{(error: NSError, response: HTTPResponse?) -> Void in
            println("got an error: \(error)")
        })
    }
We should be able to run our application, click download and see Ant-Man in all his glory.
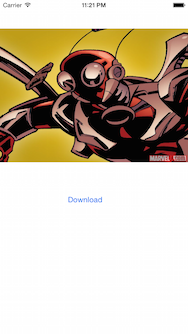
So that’s it. Hopefully you have seen enough to get started using the Marvel api in a Swift application. Good luck creating your own application that uses the wonderful Marvel universe.
Here are some references: