Flipping Cards with Swift and UIKit
July 30, 2014
xcode
swift
ios
cards
uikit
One requirement I had recently was to display cards in an iPhone application and upon tapping on it, flip the card around. This article goes into details on how to do that with the help of Swift and UIKit.
Note that this article uses Swift as an example, so you will need an Xcode 6 beta that supports the language. Of course what is explained in this article can be done with Objective-C and an older version of Xcode.
First start by creating a barebones iPhone “Single View Application.” Then proceed to add the images (back.png and front.png) that will represent the cards into the XCode Project. Here they are:

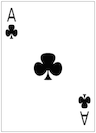
I found the images here. They have an entire deck of cards as well, if required.
Let’s start by showing just the back of the card. So in your ViewController.swift declare the following attributes.
class ViewController: UIViewController {

    var cardView: UIView!
    var back: UIImageView!
    var front: UIImageView!
}
In the viewDidLoad function, we will dynamically create the cardView and add the back image of the card. This is the code that achieves that.
    override func viewDidLoad() {
        super.viewDidLoad()

        front = UIImageView(image: UIImage(named: "front.png"))
        back = UIImageView(image: UIImage(named: "back.png"))
        let rect = CGRectMake(20, 20, back.image.size.width, back.image.size.height)
        cardView = UIView(frame: rect)
        cardView.addSubview(back)
        view.addSubview(cardView)
    }
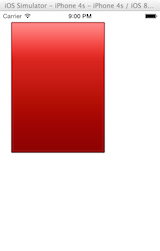
If you run the application now, it should just show the back of the playing card like this:
Lets go and add gesture recognition to the imageView so it recognises when somebody taps on it.
You need to create a UITapGestureRecognizer and pass a selector into its initializer. So to do this, you will need to modify the viewDidLoad function so that it resembles the following:
    override func viewDidLoad() {
        super.viewDidLoad()

        back = UIImageView(image: UIImage(named: "back.png"))

        let singleTap = UITapGestureRecognizer(target: self, action: Selector("tapped"))
        singleTap.numberOfTapsRequired = 1

        let rect = CGRectMake(20, 20, back.image.size.width, back.image.size.height)
        cardView = UIView(frame: rect)
        cardView.addGestureRecognizer(singleTap)
        cardView.userInteractionEnabled = true
        cardView.addSubview(back)

        view.addSubview(cardView)
    }
This will call a tapped function that doesn’t exist yet. So let’s add a function into the controller and simply make it write to the console.
  func tapped() {
   println("tapped")
  }
Now if we run the application, tapping upon the back of the playing card, should result in the message “tapped” appearing in our console.
So now we can load up an image and it can recognise users tapping on it.
Let’s add a variable to indicate which side of the card we are currently showing. So in the ViewController add this instance variable.
var showingBack = true
Default it to true as we are displaying the back of the card first.
There’s a class function on UIView that allows transitions from one view to another one. This is precisely what we need.
UIView.transitionFromView(back, toView: front, duration: 1, options: UIViewAnimationOptions.TransitionFlipFromRight, completion: nil)
The function takes the from and to views, the duration the transition should take in seconds, options like the transition animation and a completion block. Under the covers it removes the fromView from its parent, and replaces it with the toView.
So if we put it together, it will look like this.
    func tapped() {
        if (showingBack) {
            UIView.transitionFromView(back, toView: front, duration: 1, options: UIViewAnimationOptions.TransitionFlipFromRight, completion: nil)
            showingBack = false
        } else {
            UIView.transitionFromView(front, toView: back, duration: 1, options: UIViewAnimationOptions.TransitionFlipFromLeft, completion: nil)
            showingBack = true
        }

    }
If you run the application, it should look like this.
So that’s it. All the source code to this blog can be found here and thanks again to Iron Star Media for their card images.